How I built a Connect 4 AI
May 28, 2022 / 36 min read / 14,994 , 6 , 1
Last updated: September 30, 2022
Tags: games, ai, javascript, web

I wrote the board game Connect 4 for my website! 😀 Here's a link to it if you want to check it out. The game can be played against another human or an AI opponent. It can even be played AI-vs-AI, which I find kind of fun to watch -- and which made testing the AI out much easier and more scientific (more on that later). This is the story of how I wrote the AI for the game intuitively, through some trial and error. This post was updated with a significantly enhanced AI version 6 a couple days after the initial release.
Some background
A few years ago, I wrote a version of Connect 4 for my old website. I wrote that version in Python (a back-end language), and then connected it to the front end through AJAX calls (asynchronous calls between the front-end and back-end). I wanted to put the new game on my new website, but running the game on my website's server and requiring calls back and forth between the server and the player's web browser for every move was... wonky. So this time around, I re-wrote the game from scratch in JavaScript (a front-end language) so that it could run entirely in the player's web browser, playable even while offline. For the most part, I ignored what I had done the first time, though I remembered the basic concepts. It took a few days of free time coding, but I finished it. Here's a pic of the new game board, after the re-write, on a PC. On a phone, some things change places for easier viewing.
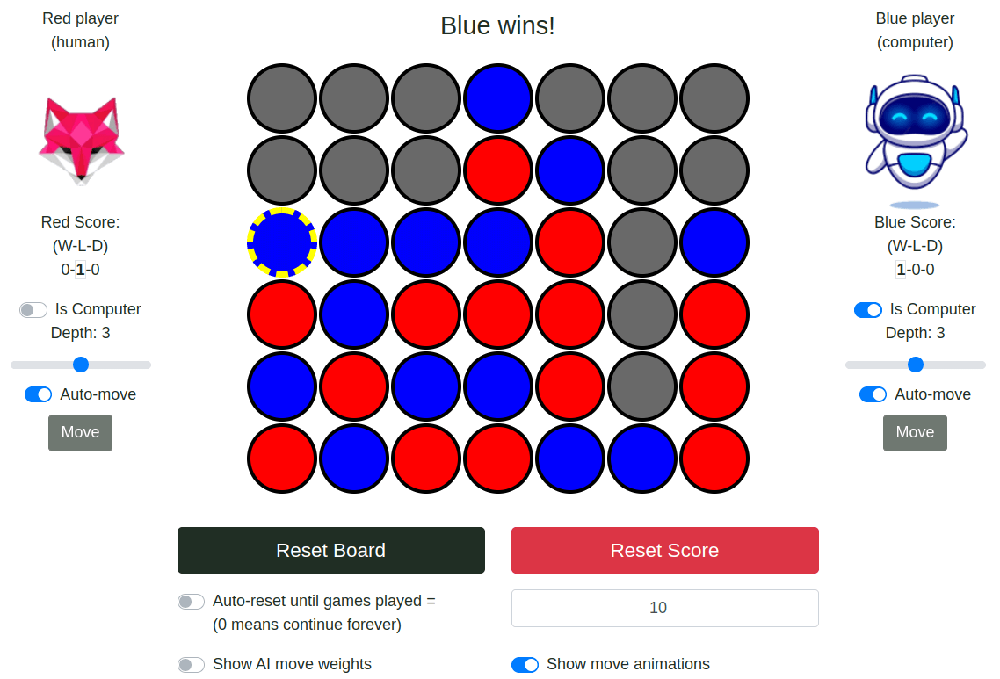
My most comfortable language is Python, so the JavaScript implementation was more of a challenge, but ultimately it resulted in a better user experience, since server-side interactions are not required. If you're interested in seeing the source code for the game, I'll link to the JavaScript "here", the CSS "here", and the HTML you can get (on a computer) by right-clicking anywhere on the page and selecting "inspect".
If you're not familiar with the classic board game Connect 4, the game is pretty simple. The game is played on a 7-column-wide by 6-row-tall vertical board. One player is 🔴 red and the other is 🔵 blue (or yellow in some versions). The 🔴 red player plays first. Players take turns placing chips into columns on the board. When a colored chip is placed into a column, it falls to the bottom available space in that column. The first player to "connect 4" chips in a row (horizontally, vertically, or diagonally) is the winner. The strategy involves playing your and your opponent's potential moves in your head to try to find scenarios in the future where you or your opponent might win. Block your opponent's potential future wins while lining up your own.
The game implementation
The basic implementation was fairly simple. First, we need to keep track of 4 basic objects:
game_grid: a representation of the game board grid in the form of a 2-dimensional array (7 columns, each holding 6 rows)player1: an object representing player 1, tracking at least the player's colorplayer2: an object representing player 2, tracking at least the player's colorgame: a coordinating object that keeps track of the above 3 objects, whose turn it is, the connections between the JavaScript objects and the HTML/CSS visuals, etc.
Next, we needed a handful of basic functions.
place_chip: A function that places a chip in the bottom space of the chosen column for the current player.change_player: A function that switches the current player.check_for_win: A function that checks if a player wins the game.paint_board: A function that updates the visual board (the HTML/CSS) to reflect the board state in JavaScript.reset_game: A function to reset the game board to the starting state.
Then we tie certain events (mouse clicks) to those functions and tie those functions to each other. Thus we make an event where a mouse click in a column of the game board will call the place_chip function. The place_chip function calls the check_for_win, change_player, and paint_board functions. A separate button click will call the reset_game function.
That rounds out the basic game. To further expand things we can add in an AI. Now we'll keep track of which player is an AI. We'll update the place_chip function to check if the new player at the turn end (after switching who's turn it is) is an AI. If they are an AI, it will call the new select_best_move function for that AI player. Through some AI magic, we'll get back a column to play for the AI player. Then we can directly call the place_chip function again using the returned AI-move-column, by-passing the "click" event in a column that a human would normally make. And then we call change_player to change the current player's turn back to the human player.
From this point, we could add more bells and whistles. We could allow switching AIs on and off, we could track wins, losses, and ties from previous games, we could add animations, and much more. I like a polished game, so I went that route and added such features to make the game a nicer user experience. But the meat of this blog article isn't about how I made a Connect 4 game itself. It's about the AI. So let's dive into that!
First attempt at an AI: AI Version 1 (AI_V1)
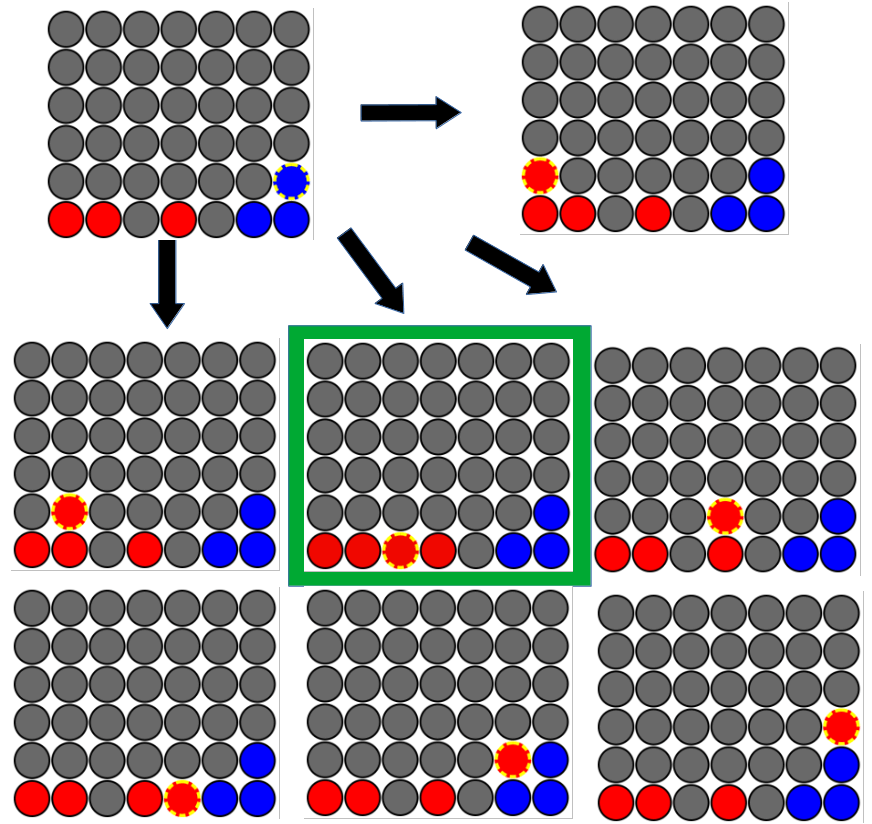
My idea for building an AI was vague. Have the AI predict future positions that were "good" and "bad". Play moves that result in "good" future positions and avoid "bad" future positions. Let's say the AI in the scenario is 🔴 red. Given a board state, I had the AI place a chip in every column for 🔴 red. After placing each chip, I checked if the AI (🔴 red) won for that board. If they won, select that column. Shown below is an example where the top-left is the starting board state. The AI places a chip into each column from there and finds that the 3rd column from the left results in a win, so the AI plays that column.
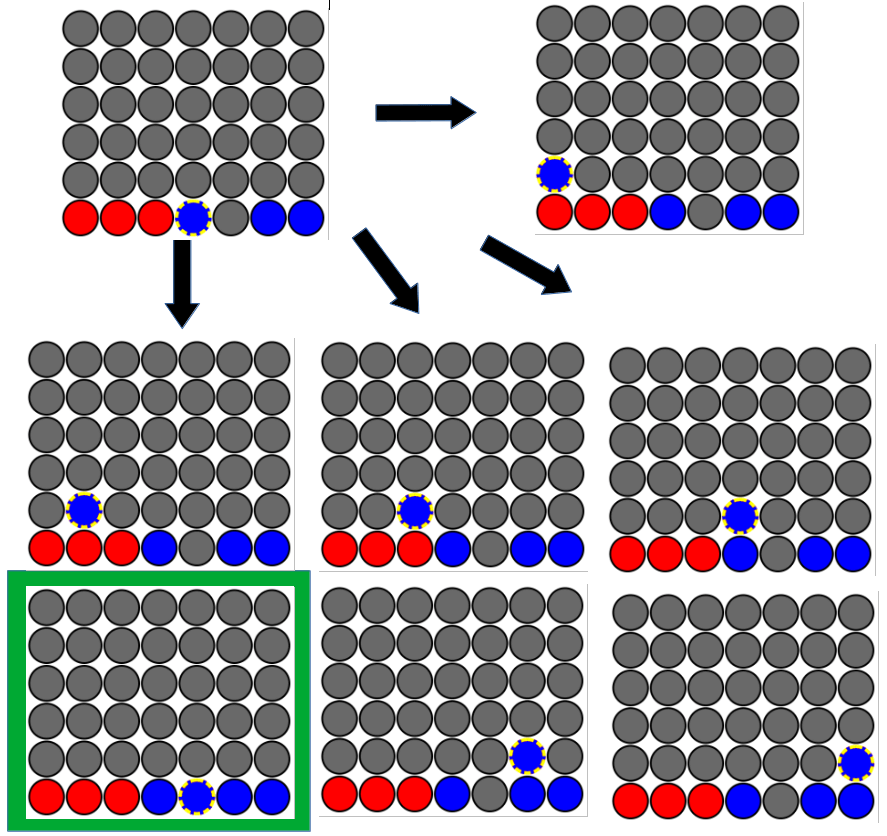
Then, if the AI didn't win by placing 🔴 red chips for itself, it resets the board state to the same initial board state. Now the AI places a chip in every column for its opponent, 🔵 blue. After each chip placement, it checks if its opponent (🔵 blue) won. If so, it selects that column because it'll block 🔵 blue's win. Shown below is an example of a different starting board state. The AI is still the 🔴 red player for this scenario. Here, after placing all the 🔴 red chips for itself, no win was found for 🔴 red so it reset to the starting board state and placed a 🔵 blue chip in each column. It sees that the 5th column from the left results in a 🔵 blue win. So our 🔴 red AI picks this column, as it will block a win from the 🔵 blue opponent.
If there were no winners after trying all 🔴 red chips and all 🔵 blue chips from the initial board state, the AI selects a column at random.
That was the basic AI. Take any immediate wins, block any immediate losses, or otherwise, play randomly. It worked alright. It'd beat me every once in a while if I wasn't paying attention. But it didn't seem very smart. I needed the AI to look more than 1 move into the future.
AI Version 2 (AI_V2)
This AI began just like our first AI. We pass a board state to the AI and tell it "You're 🔴 red and it's your turn. Pick a good column for yourself." In preparation for multiple rounds, we create a dictionary (JavaScript Object) called weights where the keys are columns and the values are integer numbers representing column weights. The higher a column's weight, the better the move is. It looks like this:
// column: weight
weights = {0: 0, 1: 0, 2: 0, 3: 0, 4: 0, 5: 0, 6: 0}
Note that the columns start with 0 instead of 1 since 0 is the first index of an array, and it counts up to 6 (7 total columns - 1 since we start at 0). The AI for this explanation is the 🔴 red player. So the AI play's all possible 🔴 red chips, giving us 7 new boards, one move into the future. As it places each 🔴 red chip, it checks if 🔴 red wins. If 🔴 red wins, instead of immediately returning the winning column, it adds +1 to the column that won in its weights object described above. And this time it stores those 1-move-in-the-future board states in an array (a list) called boards. But it only stores the board states that didn't win (because if someone wins, the game ends and play stops). Also, it needs to remember which column that first 🔴 red chip was put into, so it stores that info alongside each board in the boards array.
Let's consider this example starting board state (repeated from our AI_V1 example).
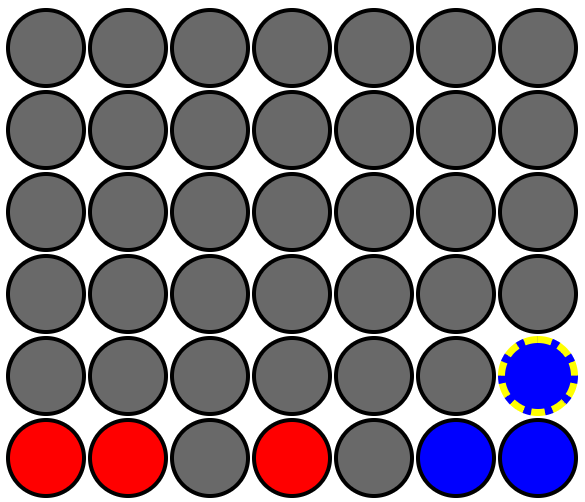
The boards array and weights object, after finding a winning board 2 (3rd column 🔴 red chip placement), would look like this.
// Example where board 2 had a win
// Skipped board 2 in the `boards` array because that resulted in a win
boards = [[0, board0], [1, board1], [3, board2], [4, board4], [5, board5], [6, board6]]
// Added +1 to column 2 (the 3rd column from the left), the column where a win was found
weights = {0: 0, 1: 0, 2: 1, 3: 0, 4: 0, 5: 0, 6: 0}
Once round 1 (🔴 red's turn) is over, we begin round 2 with 🔵 blue's turn. Each of the game boards in our boards array (filled with round 1 🔴 red chip placements) is a starting board state for 🔵 blue's turn in round 2. So from each of these round 1 board states, 🔵 blue places a chip in each column. This might result in 7 x 7 = 49 total boards to check (if no winning boards were eliminated in round 1). Again our AI checks for winners as it places the chips. If 🔵 blue wins after placing a chip, the AI adds -1 to the column chosen in round 1 in our weights object, and it ignores that board for future rounds. If no win occurs from placing a 🔵 blue-chip, we add the board to a new array boards2, which we carry into round 3.
Let's consider this example starting board state (also repeated from our AI_V1 example). Remember, our AI is the 🔴 red player.
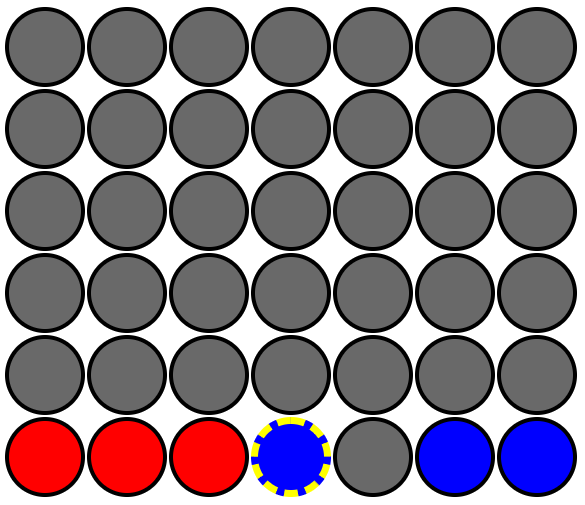
After round 1 finishes, all the column weights would still be 0, because no win occurred in round 1 after a 🔴 red chip was placed into each column. We'd have 7 initial board states in round 2 (one for each column 🔴 red put a chip into in round 1). For each of these round 1 board states, we'd now place a 🔵 blue chip in each column and check for a win. For every column 🔴 red chose in round 1, 🔵 blue should win in round 2 by placing a 🔵 blue chip in column 4 (the 5th column from the left, remember columns start with 0). This is true for every initial board state in round 2 except the one where 🔴 red chose column 4 in round 1 (thereby blocking the round 2 blue win). Each of those round 1 columns that let 🔵 blue win in round 2, would receive a -1 in the weights object. So the end state after 2 rounds from this example would be the following:
// Example where column 4 (the 5th column) had a win in round 2
// Skipped boards 4, 11, 18, 25, 39, and 46 because those boards resulted in a round 2 win for blue
boards2 = [[0, board0], [1, board1], [2, board1], [3, board2], [5, board5], ...]
// Added -1 to all columns except column 4
weights = {0: -1, 1: -1, 2: -1, 3: -1, 4: 0, 5: -1, 6: -1}
This continues every round, switching back and forth between 🔴 red and 🔵 blue chips every other round. Rounds, where 🔴 red chips are placed, will result in +1 in columns of the weights object every time 🔴 red gets a win (so potentially many +1s), and rounds, where 🔵 blue chips are placed will result in -1 in columns of the weights object every time 🔵 blue gets a win (so potentially many -1s). When the AI has reached the desired number of rounds (defined by a "depth" setting), it'll calculate which column has the highest (most positive) weight, and it'll pick that column to play. If multiple columns are equally best, it will randomly select from those highest-weighted columns.
This method of column weighting by round has advantages over the method from AI_V1. Now the AI looks for wins and losses farther into the future. Even after only 2 rounds into the future, AI_V2 will avoid losses better than AI_V1. Check out this example board state:
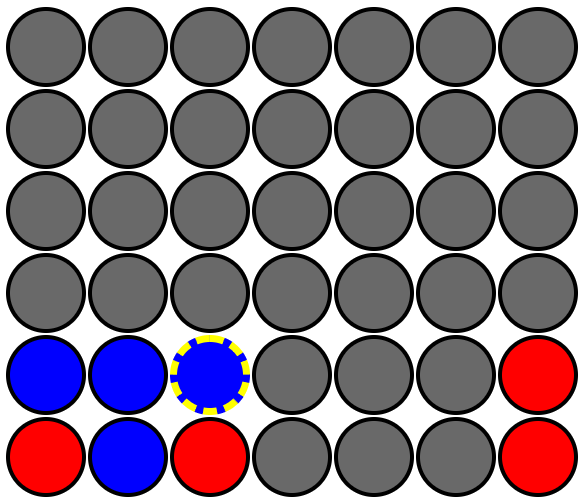
AI_V1 would find no wins for 🔴 red after placing all 🔴 red chips and no wins for 🔵 blue after placing all 🔵 blue chips. So it would pick a random column to play. AI_V2 would also find no 🔴 red wins after placing all 🔴 red chips in round 1. But in round 2, one board state would start with 🔴 red having placed a chip in column 3 (the 4th column). From this board state, 🔵 blue would find a round 2 win when it also placed a chip into column 3. When it found this round 2 win, it would add -1 to column 3 of the weights table. Thus its weights would look like so:
// column: weight
weights = {0: 0, 1: 0, 2: 0, 3: -1, 4: 0, 5: 0, 6: 0}
Thus, AI_V2 would randomly pick from all the columns with a weight of 0, avoiding column 3 which has a weight of -1.
With this multi-round approach, one can see how the time and memory for round calculations will increase exponentially with an increasing depth setting. In round 1 there are only 7 potential board states to consider. In round 2, there are 7 x 7 = 49 potential board states. By round 6, there will be 7 x 7 x 7 x 7 x 7 x7 = 117,649 potential board states to calculate. Thus AI calculations at depths 0-4 seem near-instant, calculations at depth 5 have a half-second lag, calculations at depth 6 take a couple of seconds, and soon there-after the system hangs from taking too long to calculate. Thus, I mostly kept the AI at depth 5 and below.
AI_V2 was a significant upgrade from AI_V1 under many circumstances, but it made some weird decisions I needed to figure out. Hence AI_V3...
AI Version 3 (AI_V3)
AI_V2 seemed to get worse at defending against losses at certain higher depth settings compared to AI_V1 -- specifically "odd" numbered depth settings. At "odd" number depth settings, the AI evaluated more rounds for itself than for its opponent so all those +1s overpowered the -1s of opponent wins -- even if the opponent would win faster than the AI's strategy would win for itself. Sometimes the AI Would give up a loss in 1 to have a better chance at winning 2 rounds out.
I adjusted for this over-valuing later rounds flaw by weighting earlier rounds (rounds closer to the initial board state) more strongly than later rounds. After some tinkering, I found that it wasn't enough to 1/2 the weight of each new round. I had to divide the weight of each subsequent round by the number of available columns. Thus, usually, each subsequent round would be weighted 1/7 the previous round (because 7 total available columns). So the weighting would look like this at depth 3... round 1 weight would be 7 x 7 x 7 = 343 (so +343 for each column with a win from round 1). Round 2 weighting would be 343 / 7 = 49 (so -49 for each column with an opponent win from round 2). Then round 3 would be 49 / 7 = 7 (so +7 for each column with a win from round 3).
This approach looked good anecdotally when I played moves against the computer and checked certain board states. But to be more scientific, I ran AI-vs-AI matches. I gave 🔴 red AI_V2 and 🔵 blue AI_V3 and had them play 100 game matches at various depth settings. Then I calculated win percentages of the decisive (non-draw) games and determined if the match-winner played statistically significantly better than 50% with a 0.05 P value on a one-sided binomial distribution using a binomial calculator on this website". You can read more about such calculations here.
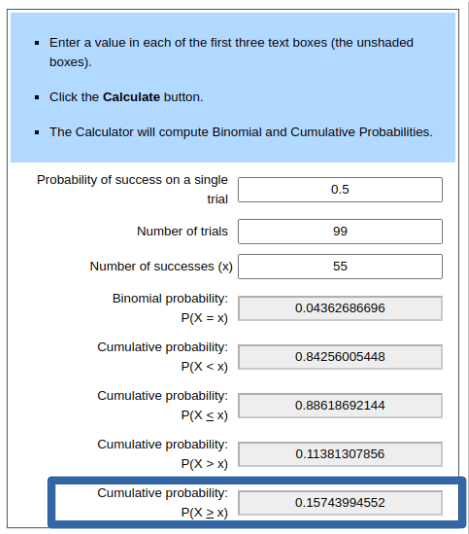
Interestingly, at depth 2, AI_V3 fared worse than AI_V2, losing 34-53-13 (W-L-D) or ~61% of the decisive games, statistically significant. But at all higher depths, AI_V3 performed better than AI_V2, especially at the odd-numbered depths. At depth 3, AI_V3 won 74% of games played and at depth 5 AI_V3 won 100% of the games (both significantly significant win ratios). In conclusion, AI_V3 was better than AI_V2, especially at odd-numbered depths. Here are the numbers.
| Depth Settings | Red W-L-D | Blue W-L-D | Win rate (of decisive) | P-score | >50% at P=0.05 |
|---|---|---|---|---|---|
| Red 2 - Blue 2 | 53-34-13 | 34-53-13 | 60.9% Red | 0.027 | Yes |
| Red 3 - Blue 3 | 26-74-0 | 4-26-0 | 74.0% Blue | < 0.000001 | Yes |
| Red 4 - Blue 4 | 33-39-28 | 39-33-28 | 54.2% Blue | 0.278 | No |
| Red 5 - Blue 5 | 0-100-0 | 100-0-0 | 100% Blue | < 0.000001 | Yes |
AI Version 4 (AI_V4)
I noticed AI_V3 (and AI_V2) were making some specific decisions that would be good against a terrible opponent (one that moves completely randomly), but that were bad against any competent opponent. Specifically, the AI would try for quick wins that required placing 2 of its own chips in the same column back-to-back without interference from its opponent. Consider this scenario:
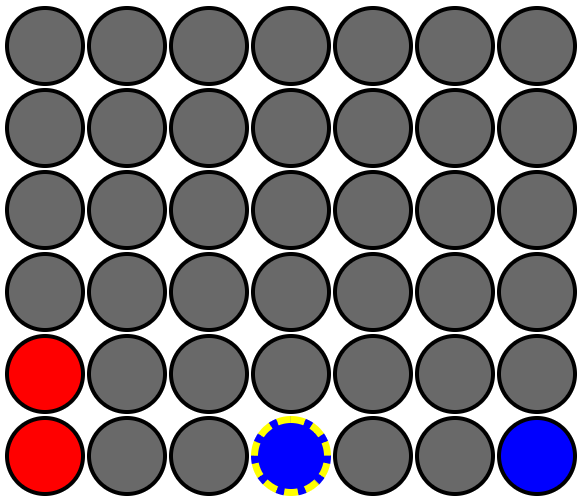
The AI is the 🔴 red player and it's its turn. Here (at depth 3+) the AI would prioritize placing a chip into column 0 (the first column) in an attempt to get a vertical win, even though its opponent could easily block the win on its next turn. This was a bad move because it meant the AI was wasting resources on impossible wins. But consider this other scenario.
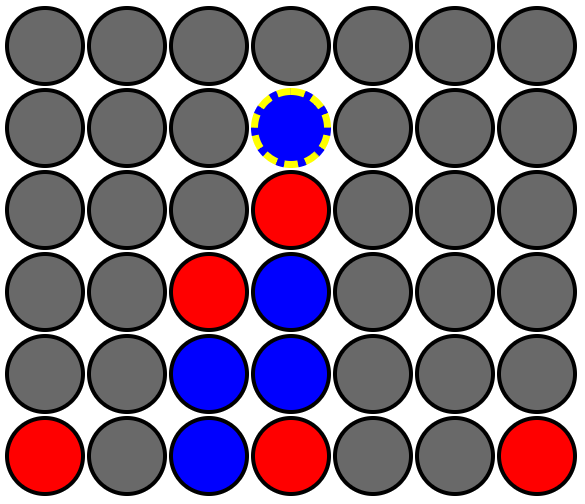
The AI is the 🔴 red player and it's its turn. Again the AI would prioritize placing a chip in column 1 (the 2nd column) in an attempt to get the diagonal win. However, this is arguable the worst column for the AI to play since the opponent will block the win on the following turn. This is doubly bad since if the opponent ever played in column 1 (the 2nd column) the AI would win in the subsequent round.
Because of this observation, I wrote in new logic specifically for round 3. AI_V4 was the same as AI_V3, except any time round 3 resulted in a win for the AI, we look back through the move history. If that win was gained by stacking 2 chips of the same color in the same column in rounds 1 and 3 (where the opponent played some other column in round 2), we consider that win a "missed win" because the "win" will be blocked by a competent opponent. Missed wins get treated exactly like losses. We subtract the round-weighted value from that column in our weights object and we discard that board-state from future round calculations. Of course, that means that we now need to keep track of the move history instead of just the first move the AI played. Thus the new boards array has sub-arrays of [move history, board-state]. The result looks like this:
// example `boards` array from round 3
// [[[col_round1, col_round2, col_round3], round3_board], ...]
[[[0, 0, 0], board0], [[0, 0, 1], board1], ...., [[6, 6, 5], board341], [[6, 6, 6], board342]]
Anecdotally, AI_V4 behaved much smarter compared to AI_V3. But again, I tested it out scientifically. Again, I played 100-game matches with AI_V3 as 🔴 red and AI_V4 as 🔵 blue. As expected, I found that there was not a significant difference between AIs at depth 2 (since our change only affects depths 3+). Surprisingly at depth 3, still AI_V4 did no better than AI_V3. But at depths 4 and 5, AI_V4 behaved significantly better. I concluded that AI_V4 was the better AI. Here are the numbers.
| Depth Settings | Red W-L-D | Blue W-L-D | Win rate (of decisive) | P-score | >50% at P=0.05 |
|---|---|---|---|---|---|
| Red 2 - Blue 2 | 44-47-9 | 47-44-9 | 51.6% Blue | 0.417 | No |
| Red 3 - Blue 3 | 48-50-2 | 50-48-2 | 51.0% Blue | 0.460 | No |
| Red 4 - Blue 4 | 33-59-8 | 59-33-8 | 64.1% Blue | 0.0044 | Yes |
| Red 5 - Blue 5 | 26-73-1 | 73-26-1 | 73.7% Blue | 0.000001 | Yes |
AI Version 5 (AI_V5)
AI_V4 was nearly there, but I noticed a couple more problems worth fixing. Every once in a while the AI would still not take an immediate round 1 win, or would still not block a round 2 loss. I assume this was because a couple of rounds out they could have even more chances of winning if they got that far. But in practice, this is never good. So I added logic to cut out early if either of those conditions were met. Specifically, in round 1, if any columns in the weights table aren't 0-weighted, we randomly pick one of those columns. And in round 2 if there is only 1 best move (i.e. all columns are negative except one), that column must be played because it blocks an opponent's win.
The other problem I noticed with AI_V4 occurred in the early game. The first 4 to 8 or so moves are always random because neither player is near connecting 4 chips in a row at that point. Because of this, sometimes the AI would randomly play moves that immediately resulted in losing positions, even at moderate depth settings. The bad move combinations were always due to stacking chips in one column. Consider the following unlucky start for the 🔵 blue AI player.
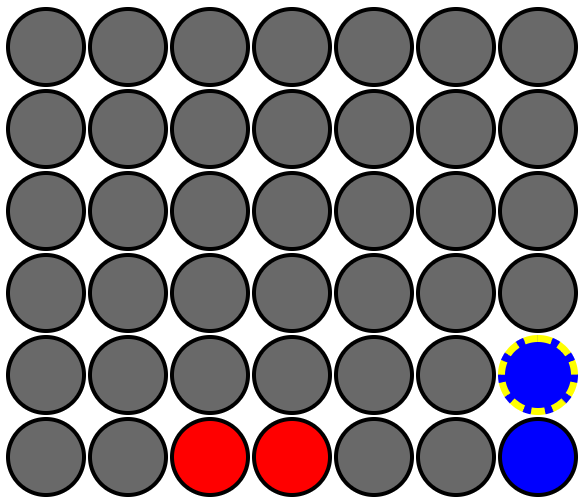
A human player (or AI depth 3+) will always win from this position as 🔴 red because if they play in column 1 (the 2nd column) or column 4 (the 5th column), the 🔵 blue player can't block their win on the following turn. To counteract this bad-luck start, I made the first 2 moves for each color not completely random when played by an AI. First, for the first 2 moves, the AI will only consider moves in the center 5 columns. Second, for the first 2 moves, the AI will only play in empty columns (columns with no chips of either color). Thus, at least at the start of the game, we never see a quick loss due to an opponent getting 3 un-blockable, horizontal chips in a row while the AI randomly stacks chips vertically.
Again our newest AI version seemed to behave smarter. But again we ran some AI-vs-AI matches to test out those changes scientifically. I played 100-game matches with AI_V4 as 🔴 red and AI_V5 as 🔵 blue. This time I was surprised by the results. At any given depth, AI_V4 had roughly equal W-L-D ratios to AI_V5. At no depth was the win percentage statistically significantly better than 50%, with AI_V4 slightly better at some depths and AI_V5 slightly better at some depths. Bummer... Still, I liked not seeing what seemed to be problems to a human observer when I played against the AI or watched AI-vs-AI matches. So I decided to keep AI_V5 over AI_V4. Here's the data from those matchups.
| Depth Settings | Red W-L-D | Blue W-L-D | Win rate (of decisive) | P-score | >50% at P=0.05 |
|---|---|---|---|---|---|
| Red 2 - Blue 2 | 48-41-11 | 41-48-11 | 53.9% Red | 0.263 | No |
| Red 3 - Blue 3 | 43-54-3 | 54-43-3 | 55.6% Blue | 0.155 | No |
| Red 4 - Blue 4 | 52-46-2 | 46-52-2 | 53.1% Red | 0.307 | No |
| Red 5 - Blue 5 | 44-55-1 | 55-44-1 | 55.6% Blue | 0.157 | No |
AI Version 6 (AI_V6)
AI_V5 was where the story ended in a previous version of this blog post. I tested it out, it seemed to beat me a lot. I ran AI_V5 vs AI_V5 matches and found that higher depth settings won significantly more than lower depth settings. The more I tested it out, though, I found another glaring flaw. If I played most of my moves in the center column, I usually won, even versus the highest depth AI setting. This led me to a fundamental realization about the game Connect 4 that I didn't understand before this point. The center column is critical to all non-vertical wins. This example perfectly illustrates what I mean.
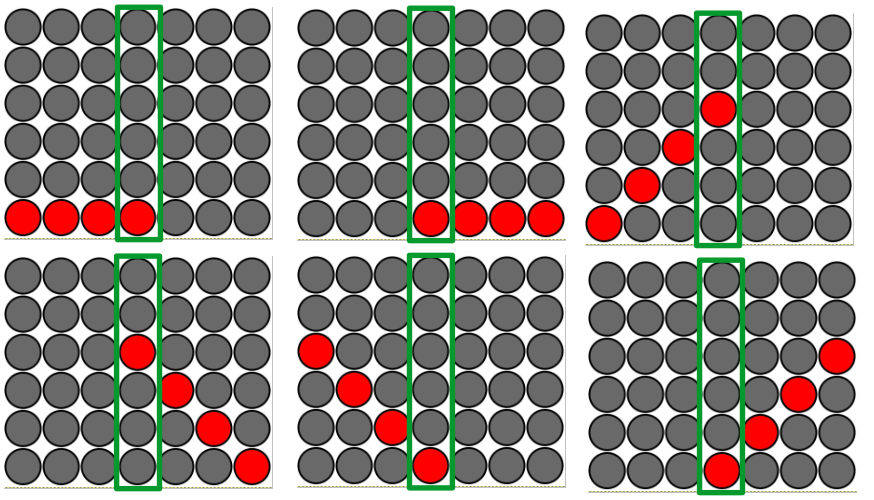
Notice how every single non-vertical win (horizontal, and diagonals in both directions) must include the center column. This ultimately means that the more chips you have in the center column, the more chances you have to win. And to a lesser extent, the closer a column is to the center, the more important it is for non-vertical wins.
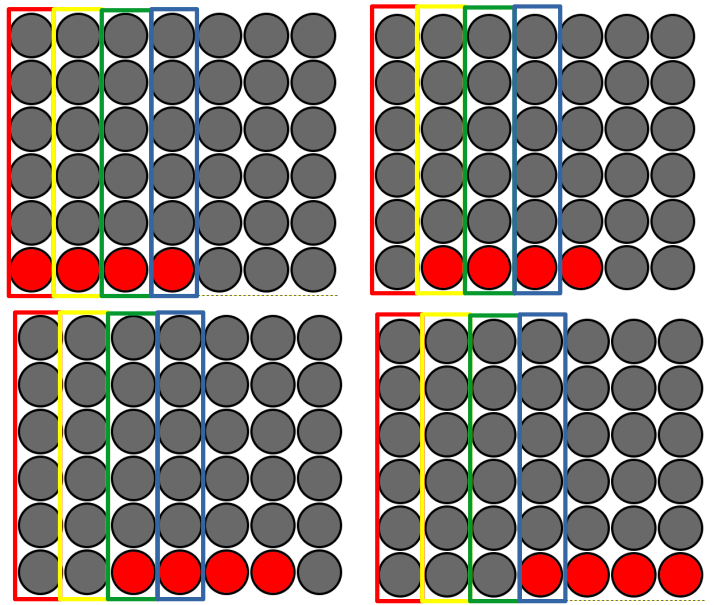
See how when just considering horizontal wins, only 1/4 wins touches the edge column (red), 2/4 wins touch the next column inward (yellow), 3/4 wins touch the next column inward -- one column from the center (green), and 4/4 wins touch the center column (blue). Thus, more chips nearer the center give greater chances for wins.
What does this mean for my Connect 4 AI? AI_V5 was good at finding quick, tactical wins for itself and its opponent in near-future board states. If the AI's depth setting was 6 (the maximum), it could find wins up to 6 moves out (3 moves worth of wins for itself and 3 moves worth of wins for its opponent). The game of Connect 4 can last up to 7 X 6 = 42 moves. So looking for wins and losses 6 moves into the future at the expense of wins/losses later in the game could be problematic. Since the AI didn't prioritize the center in the early game, it had less chances for wins later on.
I aimed to fix this short-sighted strategy with AI_V6. However, I had a lot of trouble figuring out how to prioritize middle columns. Treating columns closer to the middle like wins by positively weighting those columns produced some adverse affects. The AI would sometimes ignore the short term tactical wins/losses too much to get chips in the center and lose the game as a result. The system I finally came up with that worked out well was a fairly simple change from AI_V5. When AI_V5 determined multiple columns in the weights object were equally best, it chose one completely at random. When AI_V6 determines multiple columns in the weights object are equally best, it chooses the "equally best" column that is closest to the center column. If 2 "equally best" columns are equally distant from the center column, it chooses one of those 2 at random. The end result is that the AI heavily prefers the middle columns, while not sacrificing tactical wins/losses in near-future board states.
Note that the AI prefers middle columns only if it doesn't find wins/losses that weight outside columns more highly. At low depth settings, all columns tend to be equally weighted until a ways into the game because the AI doesn't search far enough into the future to find wins/losses early. But the higher the depth setting, the earlier the AI finds wins/losses, and thus the earlier the AI tends to give up the center in favor of the short-term tactical plays. This conflict between finding quick, tactical wins and prioritizing the center for long term win chances seems to become problematic at about depth setting 5. At this depth-setting and greater, the AI starts playing outside columns before even the critical center column is filled. Thus I was seeing lower depth AIs beat AIs at depth 5 and 6 pretty frequently. To counteract this problem, I added logic that tells the AI, "If your depth setting is 5 or greater, play at depth setting 4 until the middle column is completely filled. Then revert to your actual depth setting." With testing, this change seemed to do a good job of setting the AI up for success in the late game due to stronger center control, while still keeping the short-term tactical win possibilities alive for most of the game. Thus after the change, AIs at depth 5/6 still tended to play stronger than lower depth-setting AIs.
In addition to the large changes mentioned above, I made 2 smaller tweaks to AI_V6. First, I realized that my AI_V5 early-game strategy of spreading out the AI's first couple moves across the bottom row was straight-up bad since it gives up the critical center control. This is likely why AI_V5 was not significantly better than AI_V4. So I dropped the rule. But to avoid the quick loss scenario I mentioned when creating that rule in the first place, I made the "blue" AI (2nd player) with depth-setting below 4 (ie one that wouldn't see the loss coming) drop an early chip in the bottom row of an empty column as close to the center as possible.
Finally, another small-but-significant change is that AI_V6 doesn't even check for vertical wins after round 2. These scenarios will almost never lead to a win (or loss) since a smart AI (or human) will always block the vertical win once the opponent has placed its 3rd vertically-aligned chip. Neither side is likely to be able to place back-to-back chips in the same column to achieve a vertical win. AI_V5 treated such a scenario as a "missed win" for itself or a "win" for its opponent. AI_V6 avoids even considering such possibilities.
Once more, our newest AI version seemed to behave smarter than previous iterations. But again I ran some AI-vs-AI matches to test out those changes scientifically. I played 100-game matches with AI_V5 as 🔴 red and AI_V6 as 🔵 blue. The results were decisive. At all depths where AI_V5 and AI_V6 had the same depth setting, AI_V6 beat AI_V5 more than 3/4 of the games. Even in matchups where AI_V6 had a depth setting one lower than AI_V5, AI_V6 still won more than 65% of the time at all depth levels, statistically significant. I concluded that AI_V6 was a significant improvement over AI_V5. Here's the data from those matches.
| Depth Settings | Red W-L-D | Blue W-L-D | Win rate (of decisive) | P-score | >50% at P=0.05 |
|---|---|---|---|---|---|
| Red 0 - Blue 0 | 19-81-0 | 81-19-0 | 81.0% B | < 0.000001 | Yes |
| Red 1 - Blue 1 | 21-79-0 | 79-21-0 | 79.0% B | < 0.000001 | Yes |
| Red 2 - Blue 2 | 6-90-4 | 90-6-4 | 93.8% B | < 0.000001 | Yes |
| Red 3 - Blue 3 | 12-86-2 | 86-12-2 | 87.8% B | < 0.000001 | Yes |
| Red 4 - Blue 4 | 18-80-2 | 80-18-2 | 81.6% B | < 0.000001 | Yes |
| Red 5 - Blue 5 | 23-76-1 | 76-23-1 | 76.8% B | < 0.000001 | Yes |
| Red 6 - Blue 6 | 0-100-0 | 100-0-0 | 100% B | < 0.000001 | Yes |
| Red 3 - Blue 2 | 12-85-3 | 85-12-3 | 87.6% B | < 0.000001 | Yes |
| Red 4 - Blue 3 | 34-64-2 | 64-34-2 | 65.3% B | 0.0015 | Yes |
| Red 5 - Blue 4 | 33-66-1 | 66-33-1 | 66.7% B | 0.00059 | Yes |
| Red 6 - Blue 5 | 17-83-0 | 83-17-0 | 83.0% B | < 0.000001 | Yes |
Final testing
Now I had a final AI version, AI_V6. This is the AI on my website that you can actually play against. I played against this AI a lot and observed how it seemed stronger the higher its depth setting was set. I could quite consistently beat the AI at depths 0-2. And honestly, with my new understanding of the importance of center-control, I won most games against AIs up to depth 6 (with red), and even many at depth 6. When I played as blue, I lost more, but could still beat the AI often at depth 6.
But at the higher depth settings, I had to think very hard about my best move, and the AI did beat me pretty often. So I concluded the AI is nowhere near perfect, but it was pretty good at the game of Connect 4. And now with this final AI version, I wanted to test out scientifically how that AI fares against itself at different depths to see if deeper depth evaluations actually result in a stronger AI. I played AI-vs-AI 100-game matches. Here's an image of what those matches looks like, with side-by-side browser windows running for long periods of time.
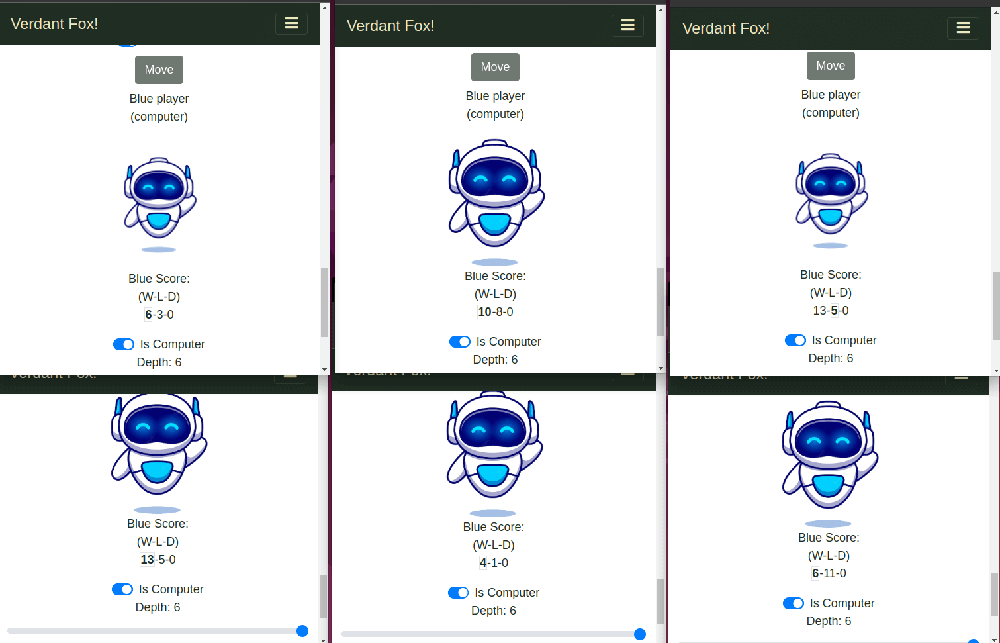
Here is the data from all of those matches.
At even depth ratios
I wanted to evaluate the AI against itself at even depth levels to see if 🔴 red or 🔵 blue had an advantage, all else being equal.
| Depth Settings | Red W-L-D | Blue W-L-D | Win rate (of decisive) | P-score | >50% at P=0.05 |
|---|---|---|---|---|---|
| Red 0 - Blue 0 | 42-56-2 | 56-42-2 | 57.1% Blue | 0.094 | No |
| Red 1 - Blue 1 | 49-51-0 | 51-49-0 | 51.0% Blue | 0.46 | No |
| Red 2 - Blue 2 | 67-29-4 | 29-67-4 | 69.8% Red | 0.000066 | Yes |
| Red 3 - Blue 3 | 16-84-0 | 84-16-0 | 84.0% Red | < 0.000001 | Yes |
| Red 4 - Blue 4 | 74-26-0 | 26-74-0 | 74.0% Red | < 0.000001 | Yes |
| Red 5 - Blue 5 | 100-0-0 | 0-100-0 | 100% Red | < 0.000001 | Yes |
| Red 6 - Blue 6 | 100-0-0 | 0-100-0 | 100% Red | < 0.000001 | Yes |
At equal depths of 0 and 1, 🔴 red and 🔵 blue won roughly equally. At all higher, equal depths, 🔴 red won significantly more than blue. It seems that 🔴 red has a significant advantage over 🔵 blue. Since 🔴 red goes first, 🔴 red gets more win opportunities. So, for all future calculations I gave 🔵 blue the higher depth AI so that if it had better win percentages, those couldn't be chalked up to 🔴 red's clear advantage from going first. Notice the 100-0-0 win-loss-draw ratios at higher depths. AI_V6 plays far less randomly than previous AI versions. It only plays randomly when 2 columns are equally highly weighted and equally distant from the center column. At higher depths, this scenario might not happen at all, meaning the games play out the same every time, leading to the 100% win ratio for one side. At lower depths settings there are more random moves, which sometimes leads to lower depth-setting AIs having better win-loss-draw ratios against higher depth-setting.
At one depth level difference
Here are the statistics for matchups where 🔵 blue had an AI at 1 depth higher than 🔴 red.
| Depth Settings | Red W-L-D | Blue W-L-D | Win rate (of decisive) | P-score | >50% at P=0.05 |
|---|---|---|---|---|---|
| Red 0 - Blue 1 | 36-64-0 | 64-36-0 | 64.0% Blue | 0.0033 | Yes |
| Red 1 - Blue 2 | 28-71-1 | 71-28-1 | 71.7% Blue | 0.000009 | Yes |
| Red 2 - Blue 3 | 48-52-0 | 52-48-0 | 52.0% Blue | 0.38 | No |
| Red 3 - Blue 4 | 0-100-0 | 100-0-0 | 100% Blue | < 0.000001 | Yes |
| Red 4 - Blue 5 | 0-100-0 | 100-0-0 | 100% Blue | < 0.000001 | Yes |
| Red 5 - Blue 6 | 0-100-0 | 100-0-0 | 100% Blue | < 0.000001 | Yes |
At all depth levels except 🔴 red depth 2, 🔵 blue performed significantly better with a +1 depth-setting advantage. The depth-setting 2 is an interesting case that comes up even at higher depth-setting differences. I attribute its high win percentage to just playing more chips in the center early on than the higher depth settings.
At two plus depth level difference
Here are the statistics for matchups where 🔵 blue had an AI 2+ depth settings higher than 🔴 red.
| Depth Settings | Red W-L-D | Blue W-L-D | Win rate (of decisive) | P-score | >50% at P=0.05 |
|---|---|---|---|---|---|
| Red 0 - Blue 2 | 10-89-1 | 89-10-1 | 89.9% B | < 0.000001 | Yes |
| Red 1 - Blue 3 | 9-91-0 | 91-9-0 | 91.0% B | < 0.000001 | Yes |
| Red 2 - Blue 4 | 42-30-28 | 30-42-28 | 58.3% R | 0.097 | No |
| Red 3 - Blue 5 | 0-53-47 | 53-0-47 | 100% B | < 0.000001 | Yes |
| Red 4 - Blue 6 | 53-47-0 | 47-53-0 | 53.0% R | 0.30 | No |
| Red 0 - Blue 3 | 7-93-0 | 93-7-0 | 97.0% B | < 0.000001 | Yes |
| Red 1 - Blue 4 | 0-89-11 | 89-0-11 | 100% B | < 0.000001 | Yes |
| Red 2 - Blue 5 | 26-74-0 | 74-26-0 | 74.0% B | < 0.000001 | Yes |
| Red 3 - Blue 6 | 44-49-7 | 49-44-7 | 52.7% B | 0.34 | No |
We can see that with a 2+ depth level advantage, 🔵 blue wins a statistically significantly higher percentage of games than 🔴 red, except when the higher depth-setting AI is depth level 6, in which case the lower depth-setting AI seems to win roughly equally with the depth level 6 AI. Interestingly, sometimes AIs at depths 2 levels lower win more frequently against higher level AIs than AIs only 1 depth level lower. I attribute this to the higher "randomness" of lower AIs and to the fact that they are more likely to play in the center than higher-level AIs. Since games don't always play out the same way every time, the lower level AI's center control can sometimes win out.
Conclusions
To conclude, we discussed briefly (in somewhat vague terms) how I built the game Connect 4. We then went through my thought process as I built an initial AI to play Connect 4 and improved it over 6 iterations. Then I played a bunch of games against the final-product-AI and concluded it was pretty strong at harder depth settings. And finally, I ran some head-to-head matchups at various depth settings to see if the AI that I built was better the farther it looked into the future, and I concluded that... it's a little complicated. Yes, under most circumstances, looking for wins and losses farther into the future leads to more wins, but also, controlling the center is extremely important to Connect 4, and sometimes just playing more in the center is better than looking for wins and losses in the near future. My final thoughts are that it was pretty fun designing this AI intuitively and iteratively through observation and testing. I think the final product turned out pretty well and makes for a fun game of Connect 4. 😀

 Verdant Fox
